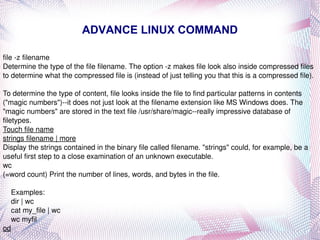
LINUX INSTALL
UNINSTALL
BASIC LINUX COMMANDS
ADVANCE LINUX COMMAND
LINUX SETUP
LINUX CONFIGURE
THE LINUX INSTALLATION HOW TO Installation overview
First installation steps:The Easy Way
Continuing The Installation
Basic Parts Of An Installation Kit
INSTALLATION OVERVIEW It's wise to collect configuration information on your hardware before installing.
Know the vendor and model number of each card in your machine; collect the IRQs and DMA channel numbers.
You probably won't need this information -- but if it turns out you do, you'll need it very badly.
If you want to run a "dual-boot" system (Linux and DOS or Windows or both), rearrange (repartition) your disk to make room for Linux.
If you're wise, you'll back up everything first!.
FIRST INSTALLATION STEPS: THE EASY WAY If you have an EIDE/ATAPI CDROM (normal these days), check your machine's BIOS settings to see if it has the capability to boot from CD-ROM. Most machines made after mid-1997 can do this.
If yours is among them, change the settings so that the CD-ROM is checked first. This is often in a 'BIOS FEATURES' submenu of the BIOS configuration menus.
Then insert the installation CD-ROM. Reboot. You're started.
If you have a SCSI CDROM you can often still boot from it, but it gets a little more motherboard/BIOS dependent. Those who know enough to spend the extra dollars on a SCSI CDROM drive probably know enough to figure it out.
CONTINUING THE INSTALLATION Prepare the Linux filesystems. (If you didn't edit the disk partition table earlier, you will at this stage.)
Install a basic production Linux from the CD-ROM.
Boot Linux from the hard drive.
(Optional) Install more packages from CD-ROM.
BASIC PARTS OF INSTALLATION KIT The README and FAQ files. These will usually be located in the top-level directory of your CD-ROM and be readable once the CD-ROM has been mounted under Linux. (Depending on how the CD-ROM was generated, they may even be visible under DOS/Windows.) It is a good idea to read these files as soon as you have access to them, to become aware of important updates or changes.
A number of bootdisk images (often in a subdirectory). If your CD-ROM is not bootable, one of these is the file that you will write to a floppy to create the boot disk. You'll select one of the above bootdisk images, depending on the type of hardware that you have in your system.
BASIC PARTS OF INSTALLATION KIT The issue here is that some hardware drivers conflict with each other in strange ways, and instead of attempting to debug hardware problems on your system it's easier to use a boot floppy image with only the drivers you need enabled. (This will have the nice side effect of making your kernel smaller.)
A rescue disk image. This is a disk containing a basic kernel and tools for disaster recovery in case something trashes the kernel or boot block of your hard disk.
RAWRITE.EXE. This is an MS-DOS program that will write the contents of a file (such as a bootdisk image) directly to a floppy, without regard to format.
BASIC PARTS OF INSTALLATION KIT You only need RAWRITE.EXE if you plan to create your boot and root floppies from an MS-DOS system. If you have access to a UNIX workstation with a floppy drive instead, you can create the floppies from there, using the `dd' command, or possibly a vendor-provided build script. See the man page for dd(1) and ask your local UNIX gurus for assistance. There's a dd example later in this document.

Sahul

  • 1.
  • 2.
  • 3.
  • 4.
  • 5.
  • 6.
  • 7.
    THE LINUX INSTALLATIONHOW TO Installation overview
  • 8.
  • 9.
  • 10.
    Basic Parts OfAn Installation Kit
  • 11.
    INSTALLATION OVERVIEW It'swise to collect configuration information on your hardware before installing.
  • 12.
    Know the vendorand model number of each card in your machine; collect the IRQs and DMA channel numbers.
  • 13.
    You probably won'tneed this information -- but if it turns out you do, you'll need it very badly.
  • 14.
    If you wantto run a "dual-boot" system (Linux and DOS or Windows or both), rearrange (repartition) your disk to make room for Linux.
  • 15.
    If you're wise,you'll back up everything first!.
  • 16.
    FIRST INSTALLATION STEPS:THE EASY WAY If you have an EIDE/ATAPI CDROM (normal these days), check your machine's BIOS settings to see if it has the capability to boot from CD-ROM. Most machines made after mid-1997 can do this.
  • 17.
    If yours isamong them, change the settings so that the CD-ROM is checked first. This is often in a 'BIOS FEATURES' submenu of the BIOS configuration menus.
  • 18.
    Then insert theinstallation CD-ROM. Reboot. You're started.
  • 19.
    If you havea SCSI CDROM you can often still boot from it, but it gets a little more motherboard/BIOS dependent. Those who know enough to spend the extra dollars on a SCSI CDROM drive probably know enough to figure it out.
  • 20.
    CONTINUING THE INSTALLATIONPrepare the Linux filesystems. (If you didn't edit the disk partition table earlier, you will at this stage.)
  • 21.
    Install a basicproduction Linux from the CD-ROM.
  • 22.
    Boot Linux fromthe hard drive.
  • 23.
    (Optional) Install morepackages from CD-ROM.
  • 24.
    BASIC PARTS OFINSTALLATION KIT The README and FAQ files. These will usually be located in the top-level directory of your CD-ROM and be readable once the CD-ROM has been mounted under Linux. (Depending on how the CD-ROM was generated, they may even be visible under DOS/Windows.) It is a good idea to read these files as soon as you have access to them, to become aware of important updates or changes.
  • 25.
    A number ofbootdisk images (often in a subdirectory). If your CD-ROM is not bootable, one of these is the file that you will write to a floppy to create the boot disk. You'll select one of the above bootdisk images, depending on the type of hardware that you have in your system.
  • 26.
    BASIC PARTS OFINSTALLATION KIT The issue here is that some hardware drivers conflict with each other in strange ways, and instead of attempting to debug hardware problems on your system it's easier to use a boot floppy image with only the drivers you need enabled. (This will have the nice side effect of making your kernel smaller.)
  • 27.
    A rescue diskimage. This is a disk containing a basic kernel and tools for disaster recovery in case something trashes the kernel or boot block of your hard disk.
  • 28.
    RAWRITE.EXE. This isan MS-DOS program that will write the contents of a file (such as a bootdisk image) directly to a floppy, without regard to format.
  • 29.
    BASIC PARTS OFINSTALLATION KIT You only need RAWRITE.EXE if you plan to create your boot and root floppies from an MS-DOS system. If you have access to a UNIX workstation with a floppy drive instead, you can create the floppies from there, using the `dd' command, or possibly a vendor-provided build script. See the man page for dd(1) and ask your local UNIX gurus for assistance. There's a dd example later in this document.